Introduction[ | ]
Vous avez donc décidé de créer votre premier village. Ce guide vous aidera pour vos premiers pas dans le monde de Stonehearth, de l'endroit où vous choisirez d'installer votre village, en passant par la création d'objets et de bâtiments, jusqu'à finir par le combat et la défense de votre peuple !
Interface Utilisateur[ | ]

L'interface principale. (Alpha 6)
The main user interface can be broken down in to several sections. The main view port showing the world fills the center of the display. In the upper right hand corner you have the clock. As the day progresses, you will see the bars around the sun slowly empty as dusk approaches. At night, you will see the same effect happen to the moon as dawn draws near. Along the bottom of you screen you have the main game controls arrayed. In the bottom left, you will see information on the villager/item/enemy selected. In the center are your main controls - the buttons with which you will command your villagers. These buttons are, from left to right, Harvest, Build & Design, Fight & Defend, Town Information, Designate Zones, and Manage Citizen. We will cover each of these buttons in more detail later. Finally, you have the controls in the lower right. The small house controls and shows your vision controls, and the the pause/play/fast forward buttons allow you to change your game speed.
There are additional screens and controls that are used in game, but we will cover those in the relevant sections.
Basic Controls[ | ]
Stonehearth is controlled through a combination of mouse and keyboard controls. A full list of all controls can be found here.
Mouse Controls[ | ]
The interface is primarily interacted with using the left mouse button. Simply click on the item or villager you wish to interact with. You can zoom in and out on your settlement by scrolling up and down on the mouse wheel. Holding down the right mouse button and dragging your mouse around will also rotate the camera.
Keyboard Controls[ | ]
To move around the world, you can scroll in all directions using the W/A/S/D and arrow keys. Additionally, you can rotate around the center of the view port with the Q and E keys.
Your First Settlement[ | ]
The first thing you will need to do is choose where you want to start your settlement. A good choice is somewhere near a lot of trees, as you will need wood for nearly everything you want to make.
Choosing a Site[ | ]
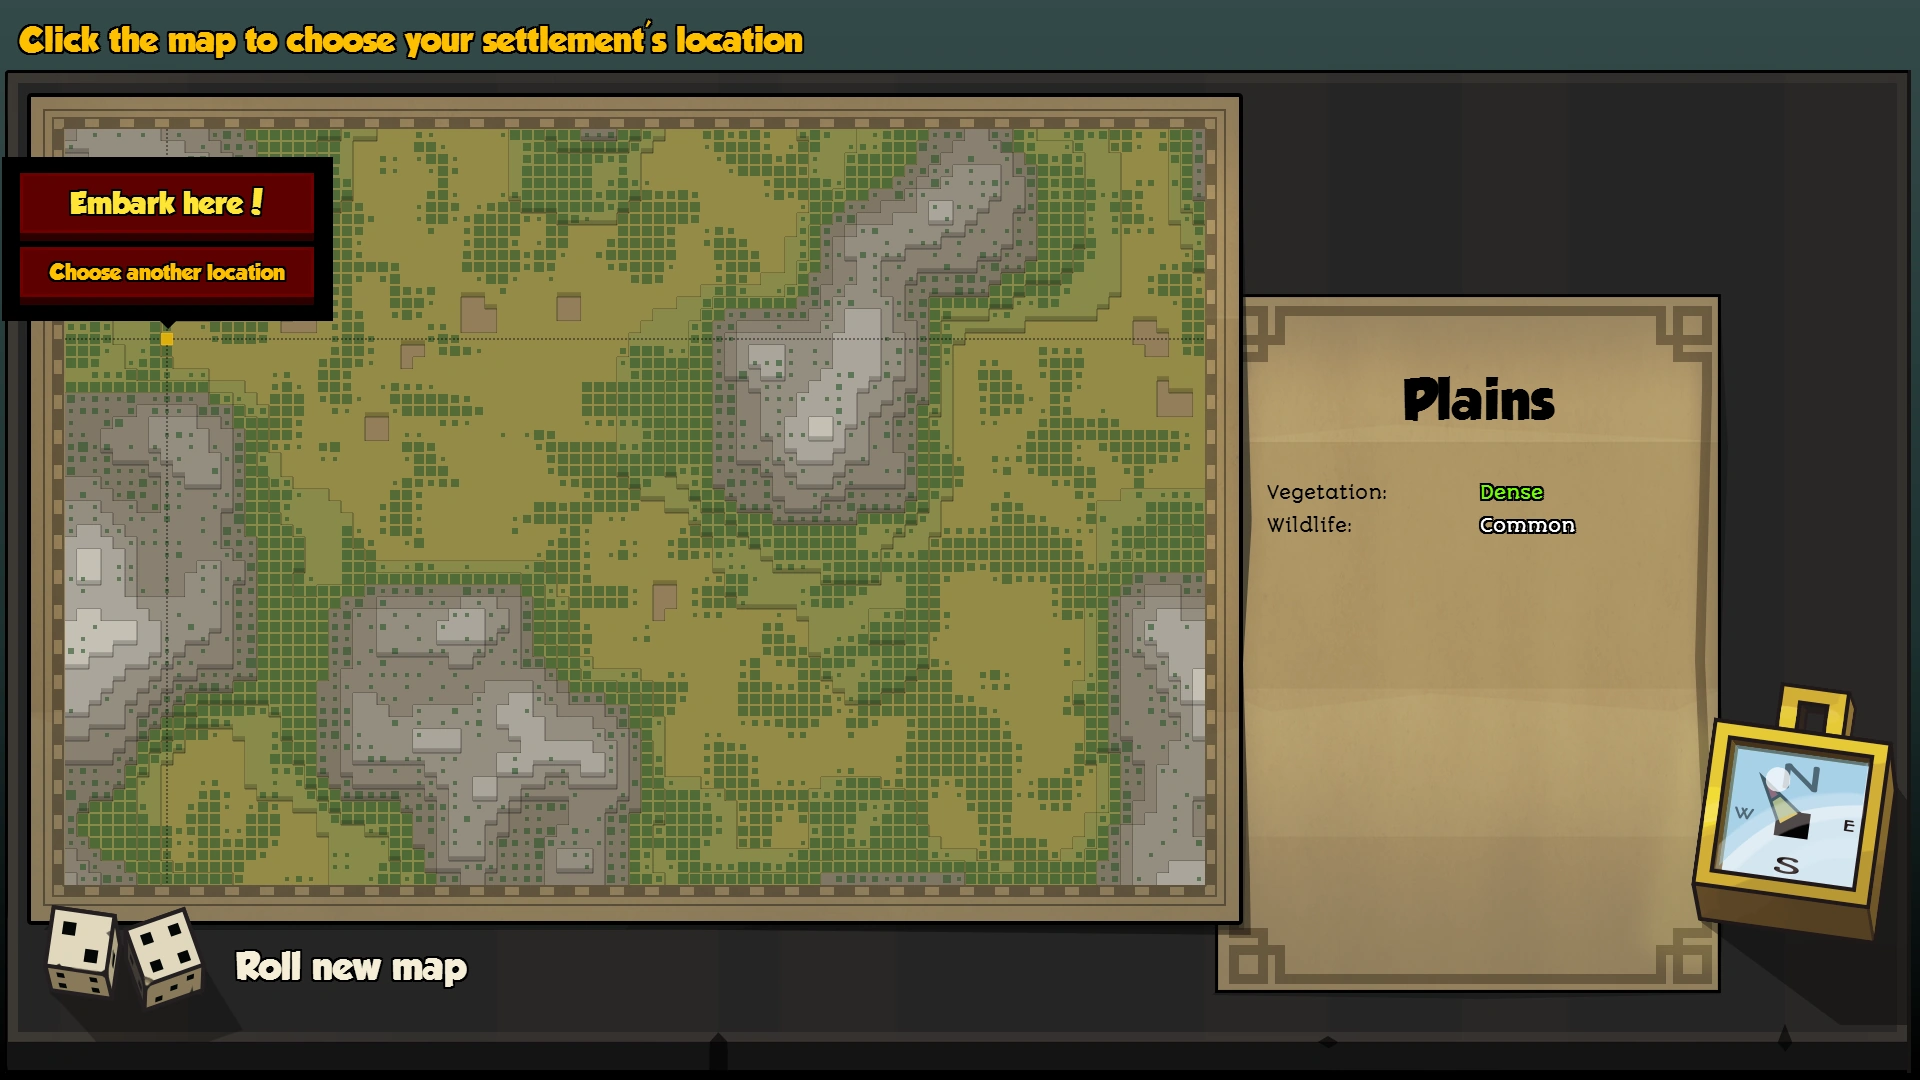
Choosing where to embark.
First, we need to pick a site to embark at. The world is randomly generated each time you start a new game, and no two worlds are the same. As you move your mouse about the map, you will see on the right side of the screen some information about the site you're looking at. For your first village, you will probably want somewhere with a lot of trees and at least some critters around. This will allow you to have enough wood for construction, and allow you to have a food supply. Once you have found a location you like, click that spot on the map and click "Embark Here!".
Placing Your Flag[ | ]
Your settlement is started when you place your flag, so we'll do that now. At the bottom center of your screen, you'll see a big blue banner. Just click this, then click on any spot in the world to start your settlement there. Don't worry, you can always pack up and move later.
With the flag has been placed, your initial group of villagers will spawn and you can name your town.
Placing a Stockpile[ | ]
The first thing you will want to do is place a stockpile to store all your goods in. Click the "Designate Zones" button (brown, with a dotted square inside), and then click "Designate Stockpile" (the blue button with a brown crate inside). Now, drag out a 10x10 square someone near your banner. This is your first stockpile, and everything you gather or create will go in to this stockpile by default.
Gathering Some Resources[ | ]
Now that we have a camp set up and a stockpile to store our goods in, we should start gathering some food and construction materials. First, click the green "Harvest" button. Now, find some trees and drag a square over them. You don't need too many, half a dozen is fine for now, and you can always cut more down later. While you're looking around, you should click the Harvest button again and drag a square out around some berry bushes to get some food. You'll see your workers running off to cut down the trees and pick berries now. Once they've completed that, they'll start ferrying your new resources back to your stockpile. Now we've got the raw materials to build, and some food so your villagers don't starve.
The First Workshop[ | ]
Now, you could leave all your villagers as workers, but the village would be a little bit boring if they only had empty houses and diet consisting only of berries. So let's give someone a new job, and start crafting some furniture!
Promoting a Worker[ | ]
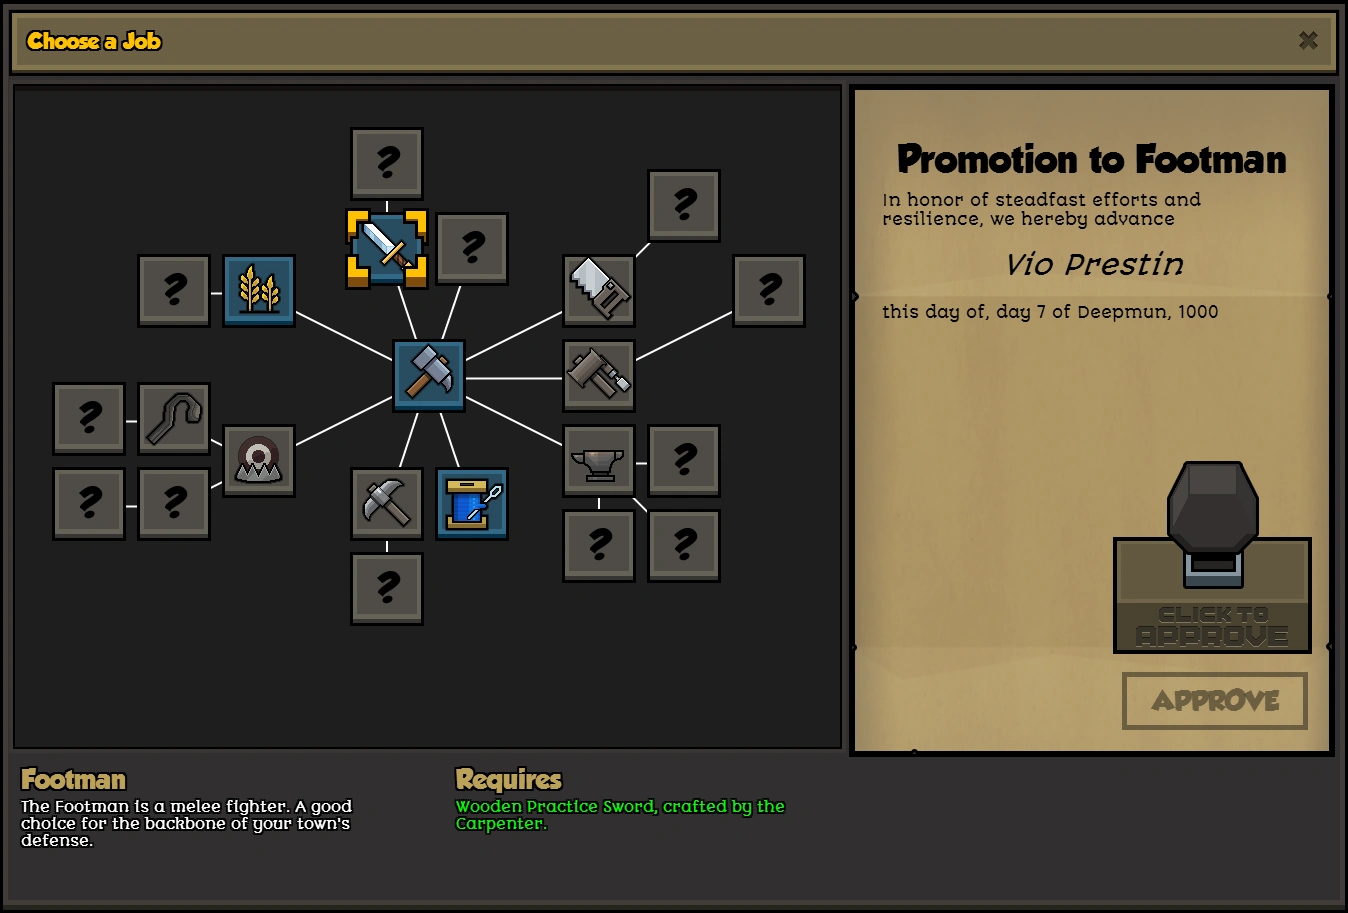
Promoting a Worker.
We are first going to create a Carpenter. This is a rather important job, as the carpenter is the one who will create much of our furniture and craft the tools we will need for some of the other jobs in the game. First, click on the "Manage Citizen" button (it's blue with a silhouette of a head in it). Now we want to pick one of our citizens to promote. Click on any citizen's name, and you'll see a button pop up underneath their name that says "Promote". Click on this button, and the "Choose a Job" window will pop up. It's from this screen that you can assign any citizen to a new job, once the requirements are met. Click on the Carpenter icon (it's a saw) and then click the big rubber stamp the right. Congratulations! You've now told someone to become a carpenter. This lucky citizen will now run to your stockpile, grab the Carpenter's Saw, and they'll have a new job. Now we can get to work, right? Not quite. First, we need to give our new carpenter somewhere to work, and build him a workshop.
Building a Carpenter's Workshop[ | ]
How do we build a workshop for our carpenter however? Easy. Go back to the "Manage Citizen" button, and click on your new carpenter's name. Now there is a new button next to "Promote", labelled "Build Workshop". Click this button, and then click anywhere on the ground to tell the carpenter to build their workshop at that spot. You will need one wooden block to build the workshop, so if there aren't any in your stockpile, go cut down a tree.
Crafting Your First Items[ | ]


The Carpenter's Workshop.
Now that we have our first workshop set up, we can place some orders with the carpenter and get them to build us something. Click on your carpenter's workshop, then click the anvil in the bottom left corner of the screen. The screen that pops up is the main view of the workshop. From here you can place orders and manage the current work queue for the crafter. At the top of the screen is what workshop we're looking at and who owns it. You can have multiple of each crafter, and they will each need their own workshop. On the left side of the screen, there is the list of all items that can be crafted. Ones that the crafter is not able to craft yet are grayed out. This does not mean the resources needed are missing, but that the crafter is not of a sufficient level to craft that item yet. Crafters gain experience as they craft items or complete tasks, and once they gain sufficient experience, they'll level up gaining new abilities and recipes. You can see the experience requirements for levels here.
Continuing through the crafter window, on the upper right, we see information on the item we've selected. Here it will give you some information on the item and the requirements to craft it. Below this, we can see the buttons to select how many we want to craft, and a big button to place our order. Once you've ordered an item, it will appear in the crafting queue on the far right. The currently crafted item is at the top, and the next item appears below that, so on and so forth. If you want to cancel an order, just drag it from the queue down to the trash bin, and it will remove that item from the queue. You can also drag one item above or below another item in the queue to reorganize if you find you need something a little sooner. Once an order has been placed, your crafter will go and collect any resources they need to start crafting the item and then build it. Completed items will be placed in the nearest stockpile.
Now that we've toured the crafter UI and learned a little about how they work, it's time to actually give our carpenter some work. We're going to order a couple items that we will need soon. Go ahead and order one Wooden Door, five Wooden Window Frame, two Wooden Wall-mounted Lantern, and four Mean Bed. The carpenter will now run off to gather some wood and start crafting these items. Keep an eye on your stockpile, as if the carpenter runs out of wood, you'll need to go order some more trees to be cut down.
While the carpenter is working on these, it's time to address some of the villager's other needs.
Securing a Food Supply[ | ]

Building a farm.
If you watch the thoughts of your citizens scrolling up in the bottom right corner of your screen, you may have noticed some thoughts about the quality of the food. So far, we have only had berries to provide to our villagers, and unfortunately, they're not a popular food choice. So what should we do? Get some new food of course! Fortunately for us, we can make one of our workers into a farmer, who will build some farms and get us more and better food.
Promoting a Farmer[ | ]
To promote a farmer, first you will need a Farmer's Hoe. This is crafted at your carpenter's workshop, so go back to your carpenter and ask him to build you a hoe. Once he's completed that, go back to "Manage Citizen" and pick who you want to promote to a farmer. Bear in mind each citizen can only have one job at a time, so pick someone other than your carpenter. Click the lucky citizen, and click "Promote". Look for the icon of a hoe, then click the stamp to promote. The citizen will go and get their new hoe, and will now be a farmer! So how about we put them to work?
Designating a Farm[ | ]
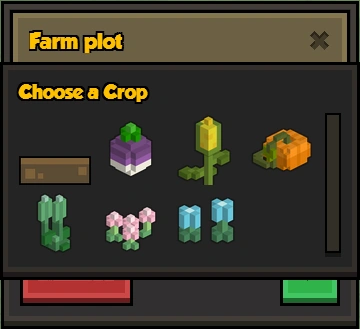

Choosing a crop.
Now that we have a farmer, we can designate a farm and start growing some crops. Click on the "Designate Zones" button again but now click the green button with the corn in it. This is a "Farm Zone" button, and allows us to designate where we want to till out some land to plant on. Find an open area near to your existing settlement, and drag out an area of three by nine. Now a box will pop up and prompt you to choose what to grow. Click the brown bar in the middle, and you'll be presented with all of the available plants to grow. We want something quick to grow, so pick the Turnips - the purple and white bulbs. Your citizens will prefer these to a diet of never ending berries. To complete the farm plot and get the farmer to work, just click the green check marks. You can also drag out some other plots if you'd like to grow more crops and give your citizens from variety. Only having one type of food will lower morale and make your citizens unhappy.
Building a Home[ | ]
Now that we have a carpenter to craft some basic furniture and a farmer to ensure we have a steady supply of food, it's time to start thinking about getting a roof over the villagers heads. A villager who sleeps on the ground and not in a bed is not going to be as happy or as efficient as a villager who did get to sleep in a bed. So now let's use some of the things we built earlier and set up a house!
Using a Template[ | ]

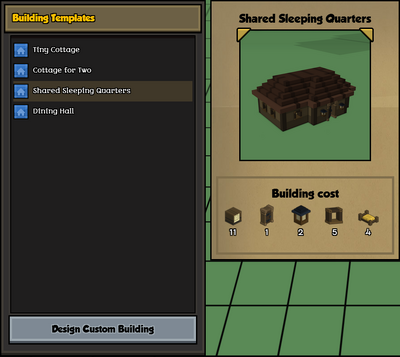
Choosing a building template.
There are two ways we can build a house - either through a template or by designing our own building. Templates are buildings that the developers have constructed or ones that you've saved, and provide an easy way to construct multiple of the same building. For now, we're just going to use a template to quickly get something built.
First, click on the "Build & Design" button on your menu - it's the brown button with a hammer. Then click on the "Construct a Building" button - a house on a brown background. Now we're in the construction UI, and can pick the building we want to start putting together. The developers thoughtfully include a couple of pre-designed buildings for us to use. We want to build a Shared Sleeping Quarters, so click on that, and then point your mouse to a nice open space on the ground to build it. You will see a ghostly preview of the building showing up that follows your mouse around. If you try and put it in a location that you can't build on (another building, inside a cliff or even off the edge of a cliff), the preview will disappear until you move your cursor far enough away. You can also press the comma and period keys on your keyboard to rotate the building. Once you've found a spot you're happy with, click on the ground to place your building. The advantage of templates is you could now click again in another spot and lay out an identical building - good if you want to plan out a row of houses. Once you've selected where you want to build your house, right click to stop placing buildings, then click the ghost of the house you just placed. This will bring up the building editor, where you can change features about the building. We're not changing anything now, and just want to start building. Click the green "Build" button at the bottom of this window and then confirm. Your workers will now run off to gather supplies from stockpiles and start work on building a house. The Shared Sleeping Quarters uses all wood in its construction, so you may want to chop down a couple more trees to ensure you have enough wood to complete construction. Once the shared quarters have been completed, your citizens will now have a nice big dormitory to sleep in.
Designing a Custom Building[ | ]
You can also design and build your own structures. Go here to see more information.
Defending Your Village[ | ]
Your villagers should now have someplace to sleep and a steady food supply. But you may have noticed some goblins crawling around, and you have likely got some warnings that goblins are stealing your stuff. These nasty little thieves will take your food, furniture, or indeed anything that isn't bolted down. You can always build walls to keep them out, but then you're stuck behind the wall and can't get to anything outside. So what should you do? Well, fight them off of course! But how?
Red Alert![ | ]
The simplest way of starting combat and killing the invaders is to call a Red Alert! This mode will cause your workers to stop whatever they're doing and kill anything in their line of sight. You can call a red alert by clicking the "Fight & Defend" button on your menu, then clicking the lone option there. This will sound a horn and all your citizens will pull out their tools and chase after any enemies they can see. When a Red Alert is called, your citizens will not eat, sleep, or do any work. So to end the Red Alert, just click the Red Alert button again to sound a bell and tell your citizens to return to work. There's only one problem. Your citizens are not trained soldiers, and aren't all that effective in a fight. This is fine when there's only one or two goblins running through your village, but what about some better protection?
Promoting a Footman[ | ]
The footman is the answer. They wear armor and carry a sword, so they will last a lot longer in a fight, and hit a lot harder. Those pesky goblins won't know what hit them! So how do we make one? Simple. Just like promoting any other class, we go to "Manage Citizen" and select someone to promote. We do however need a weapon to give a citizen to make them a footman. So go back to your carpenter, and order up a Wooden Practice Sword. Once that has been built, go to your lucky citizen and click "Promote". You'll now see the sword icon for the footman has turned green, and you can promote them. The citizen will go get their new sword and take up their new duties as the protection for your town. The footman will patrol the settlement and run to combat any enemies who appear, regardless of whether you have called a Red Alert or not. Now there is one downside. Your footman will not assist with construction, harvesting or any other activities. They will only patrol your settlement and defend it against all enemies. But now, you don't have to worry so much about stopping everyone else from working, as any footmen you have will defend your homestead. There is no way as yet to command a footman to go to a certain spot or follow a certain patrol route, so if you get a lot of goblins coming to your village, and your footman is asleep or somewhere out of line of sight, you may still need to call a Red Alert and have your citizens take up arms to defend their homes.
Where To Go From Here[ | ]
Now that you have set up your town, promoted your first crafter, and started building your first housing; where should go from here? Well, you can start building more housing for your villagers, try out some of the other jobs, or set up walls and fences to defend your fledgling community. This wiki is full of information on classes, enemies, and items. You can also check out some mods to add new features and change various parts of the game.
Good luck, and have fun!